
Something that infuriates me often with government datasets is the promiscuous heading. This is when a spreadsheet doesn’t just have its headings across one row, but instead splits them across two, three or more rows.
To make matters worse, there are often also extra rows before the headings explaining the spreadsheet more generally. Here’s just one offender from the ONS:

A spreadsheet with promiscuous headings
To clean this up in Excel takes several steps – but Open Refine (formerly Google Refine) does this much more quickly. In this post I’m going to walk through the five minute process there that can save you unnecessary effort in Excel.
Get the data
The spreadsheet shown above is as bad as any I’ve seen, so I’m going to use that. You can download it from here directly (XLS) or find a link to it in context at the bottom of the ONS’s page on New Orders in the Constructions Industry Q2 2012 (it’s the last link on that page).
Yes, the data is dull – that doesn’t really matter. What matters is it’s also damn ugly.
Import into Open Refine
Once you’ve downloaded that data, make sure you’ve also downloaded and installed Open Refine, and run it.
It will open in your default browser at the address http://127.0.0.1:3333/ – this is not a website: it’s basically a window into your own machine. Note: If your default browser is Internet Explorer, copy that address into another browser – Chrome or Firefox – or you’ll hit problems.
Select Create Project on the left of this new window, make sure This Computer is selected in the main area to the right of that.
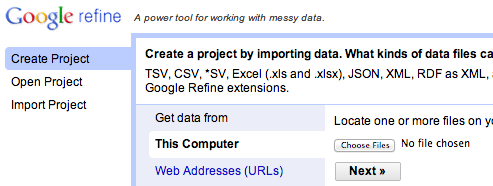
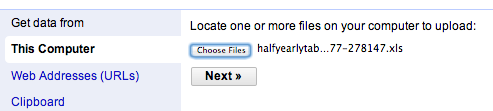
Now click Choose Files to find that ugly spreadsheet where you saved it on your computer. Select it, click OK, and you should have a view like this:
Now click Next to move to the next, key, step.
You are now in the Configure parsing options step – those three words appear across the top of the window, next to the ‘Start over’ button that takes you back.
To the right is the Project name box where you can give your project a snappier title than halfyearlytablesjanjun2012revisederror_tcm77 278147 xls
But underneath is a preview of those ugly promiscuous headings:

That’s just a preview. To make it prettier, you’ll need to do some work underneath:
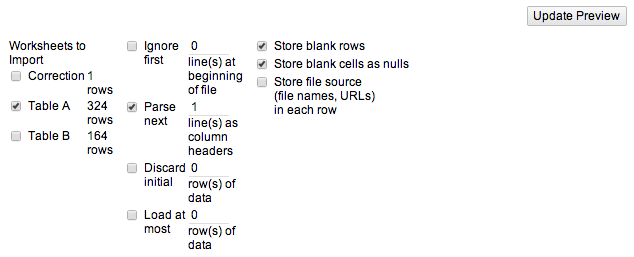
These are the parsing options. I’ll go through them one by one:
Worksheets to Import
This area lists the sheets in the spreadsheet you’ve selected. It will generally automatically select the first containing data, but you can tick a different box to select that one instead.
In the image above Table A, which is the second of three sheets, and has 324 rows, has been selected. Untick this and tick Table B instead.

Notably, you can select multiple sheets too – so if your data is split across multiple sheets (for example one for each month or year) then you can tick them all and Open Refine will combine them into one.
Ignore first … line(s)
To the right of that area is a tickbox that says Ignore first ____ line(s) at beginning of file. If you tick the tickbox and enter a number in the box to the right, this will ignore the specified number of irrelevant rows at the start of your sheet.

Well our sheet certainly needs that, so tick the box and enter ‘3‘ in the box above line(s) at beginning of file.
The preview should now update to remove the first 3 lines, to look like this:

The updated preview with first 3 lines now ignored
Parse next … line(s) as column headers
The next area allows you to specify which lines contain your headings.
The tickbox should already be selected with 1 in the box to the right of it. (If it has 0 in it means it is not treating any line as your headings).
But our headings actually run across the first four rows: the units (£ Million) are in line 1, the year in line 2, the start month in line 3 and the end month in line 4.
 Change the 1 to 4 to indicate this then:
Now your preview should update to look like this:

The text in each cell has been merged to create a single heading for each column.
Now they’re not perfect: the first column says £ Million REGION but actually only contains regions. The third heading gives the full year and month range (2009 is shown as 2009.0 because Refine thinks it is a number and has added a decimal place), but the fourth heading just says July- Dec with no year.
These are small tweaks we can make in Refine later, or in Excel – the point is that we’ve saved a lot of fiddling already by getting to this point so quickly.
Discard initial … row(s) of data
The next tickbox allows us to discard any further irrelevant rows. As it happens we do have one initial row after our headings which we don’t need – it’s empty.
 So tick that box and enter a 1 in the next box to tell it to discard that first irrelevant row.
Load at most … row(s) of data
 The bottom tickbox in this column allows you to limit how many rows you want to load. This is useful if your original data is too big and you only want to work with an initial sample of it, or you know the first 100 rows are the only ones that apply to your project.
That’s not the case here, so you can leave that unticked.
Store blank rows
The final column has three tickboxes as follows:

- Store blank rows
- Store blank cells as nulls
- Store file source (file names, URLs) in each row
The first two of these will likely be ticked. But do we want to store blank rows?
That first blank row in our data should have rung an alarm bell: we got rid of it, but a quick scroll in the preview window shows us it’s not the only one:

That blank row after the first region’s data and before the second region
The problem with blank rows is that every time a spreadsheet software like Excel hits them, it assumes it’s the end of the data.
In this case it is the end of the data about one region, but chance are we want to perform calculations across more than one region, so we don’t want that to happen.
Unticking Store blank rows solves that problem at a stroke – there won’t be any blank rows in our preview – and our project – now.
The other two tickboxes are not relevant here but warrant an explanation:
I am not sure what store blank cells as nulls is about, but I’m guessing it’s something to do with making the data more compatible with queries or expressions using SQL or GREL.
Store file source (file names, URLs) in each row is useful to tick if you’re combining more than one file here. At the start of this process when you selected this spreadsheet you could actually select more than one: ticking this box would allow you to add a new row which specified which file each row came from, so you can filter those out if you needed to.
Anyway, we’re not ticking those. So we’re all done. When done quickly the process of setting those options can take seconds. Here it is summed up:
- Tick the sheet(s) you want to import
- Enter how many initial rows you want to ignore
- Enter how many lines the headings are spread across
- Untick ‘Store blank rows’
- Click Create Project
Click that final button – Create Project (in the upper right corner next to the project name) and your project will be created. It should look like this:

The data in project view
Other cleaning – renaming the column

There is a little more cleaning that can be done before we export this as a file we can use in Excel. For example, those headings can be tidied up a little while you remember, by clicking on the drop-down menu at the top of the column and selecting Edit column > Rename this column, then editing the column heading in the window that appears.
A record for every town, not every region
 Another issue is that each region name appears only once, even though there will be half a dozen rows related to it. We want it to appear in all of those rows.

To do that, click on the drop-down menu at the top of the region column and select Edit cells > Fill down.
This will fill any empty cells with the same value as the last cell above them to have one.
That should give you a result like this:

Final tidying
That’s saved you a lot of copying and pasting – although you will need to clean up the ‘Yorkshire & The Humber’ lines which have been given two names: ‘Yorkshire &’ and ‘The Humber’ (there is a way to do this in Refine, but a quick Find and Replace in Excel should solve this too).
Likewise, there are a few cells in this particular example which were merged on the original data (I told you it was ugly) – here they will appear as one cell containing that value, and the one below being empty.
You can decide yourself how you want to treat those depending on their centrality to the data – you will have a copy of your original data to refer to (as you always should). A manual edit back in Excel may address it – the key thing is you’ve saved yourself all that other legwork so that it shouldn’t feel nearly as tiresome as it would.
Having all of these problems together is very rare – I picked this dataset as a way of showing them all, but please don’t think it is in any way typical.
With most datasets Open Refine is a tool you can use for five minutes to remove those irrelevant rows, merge heading rows, and empty rows too, before clicking the Export button in the upper right corner to save a version you can open in Excel.
For more introductory help with using Open Refine, there’s a previous post from this blog.

Pingback: Excel Roundup 2014013 | Contextures Blog
Pingback: How to: combine multiple rows in a dataset where text is split across them (Open Refine) | Online Journalism Blog
Pingback: How to: clean a converted PDF using Open Refine | Online Journalism Blog