Tag Archives: tableau

How to: create a treemap in Tableau

tableau treemap buzzfeed

Treemaps are a great alternative to pie charts when you want to tell a story about the composition of something: whereas pie charts can be limiting, treemaps allow users to drill down into ‘parts of parts’, and group elements within particular categories.

In this post I’m going to show you how to create a treemap in the free visualisation software Tableau Public to show how the majority of BuzzFeed’s content views in 2015 took place away from its website.

This data suits a treemap particularly well: although the traffic is broadly split between ‘website’, ‘Facebook’, ‘Snapchat’, ‘YouTube’ and ‘other’, there are also subdivisions within some of those platforms – for example, Facebook traffic is split between video and images, and website traffic is split between direct visits, those via Google, and those via Facebook. A treemap allows users to explore those subtleties in a way that pie charts do not.

Step 1: Get the data in the right format

To create a treemap it is vital that you get the data in the correct format to begin with. In particular, you will need to make sure that as well as a primary ‘category’ column, you also have a second ‘sub category’ column. They don’t have to have these names, but that general concept is important. A third column should contain the values to be visualised.

treemap data format

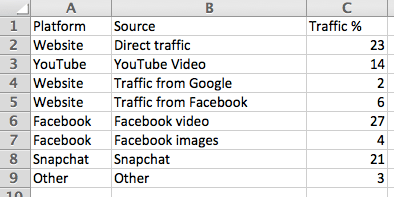
The key feature to look for in this data structure is that you should expect to see categories in your main ‘category’ column appear more than once. In our BuzzFeed data, for example, the platform category ‘website’ appears 3 times – once for each ‘Source’ sub category of ‘Direct traffic’, ‘Traffic from Google’ and ‘Traffic from Facebook’.

Also, make sure that your values only use numbers – don’t add percentage symbols, commas or other characters that might lead to it being interpreted as text and mean you have to reclassify the data later.

If you need a dataset to work with, I’ve uploaded the Buzzfeed figures here (you’ll need to save it to your computer).

Begin creating your chart

In Tableau Public, connect to the data you’ve just created, and go to your empty worksheet. On the left you should see your category (in this case, ‘Platform’) and sub category (in this case ‘Source’) columns in the Dimensions area; and underneath that in the Measures area, your values (in this case, ‘Traffic %’).

Click and drag your main category dimension (‘Platform’) into the Rows area at the top. Then do the same with your measure (‘Traffic %’) so that it looks like this:

Platform and traffic % in rows

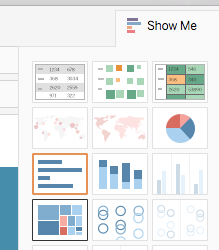
Tableau will automatically draw a chart for you – but ignore that. Instead, look to the right hand side where the ‘Show me’ menu should now be showing which chart types you can use with this combination of data. If it doesn’t show, click ‘Show me’ in the upper right corner.

One of the options available should be the treemap – it’s normally the first option four rows down. Click on this to change the chart to a treemap.

Show me menu

Now we have a treemap – but it’s only showing the top-level category (in this case, ‘Platform’). We need to customise it a bit to get a treemap which allows users to see the sub-categories too.

Customising the colours and slices

To the left of the chart itself you should see a box titled Marks containing buttons for Color, Size, Label, Detail and Tooltip. And underneath those buttons, icons indicating three settings:

  • The ‘Size’ icon is set by ‘SUM(Traffic %)’
  • The ‘Color’ icon is also set by ‘SUM(Traffic %)’
  • The ‘Label’ icon is set by ‘Platform’

Treemap

First we need to change it so that the ‘Color’ is determined by the main category (‘Platform’). To do that, click and drag the ‘Platform’ dimension onto the Color button.

Now, instead of one colour in different shades representing an amount, you should have five colours – one for each category:

Treemap coloured by category

We can customise the colour further by clicking on the ‘Color’ button and clicking Edit colors…. This will open up a new window with a list of categories on the left, and a palette on the right. In our case it makes sense to assign relevant colours to each platform: yellow for Snapchat, red for YouTube, and blue for Facebook. I’ve also chosen grey for ‘Other’. If you prefer other shades you can access other palettes using the dropdown menu in the upper right corner. Click ‘Apply’ to see the results, and ‘OK’ to apply and leave this window.

Edit colors menu

Next, we need to bring in that sub-category (‘Category’) in. A good place to do this is on the ‘Label’: because we are already using colour to indicate the platform, we need the label to add that extra information about the source of traffic to that platform.

To do this, click and drag the ‘Category’ dimension onto the Label button.

Now the area of colour for each platform should now split into further parts based on this new category. In addition, the text labels should reflect that information too.

Treemap

Other customisation

The chart is now pretty much ready. That just leaves the title to customise: at the moment it is automatically taking the name of the sheet, so you can change the title by double-clicking on the sheet tab at the bottom and renaming it. Alternatively you can double-click on the sheet title and replacing it in the window that opens.

You can also customise the Tooltip – for example a % sign needs adding after the percentage figure on each slice.

Guest post: 10 lessons from data journalism training

Following my post on data journalism teaching fellow trainer Peter Verweij got in touch to share a post which first appeared on his blog earlier this month. I’m reproducing it here with permission. A Dutch version is also available here. Continue reading

Data visualisation training

If you’re interested in data visualisation I’m delivering a training course on November 7 with the excellent Caroline Beavon. Here’s what we’re covering:

  • Pick the right chart for your story – against a deadline
  • Mapping tricks and techniques: using Fusion Tables and other tools to map Olympic torchbearers
  • Picking the right data to visualise
  • Visualisation tips for free chart tools
  • Avoiding common visualisation mistakes
  • Create an infographic with Tableau and Illustrator
  • Making data interactive

More details here. Places can be booked here.

Data journalism pt4: visualising data – tools and publishing (comments wanted)

This is a draft from a book chapter on data journalism (here are parts 1; two; and three, which looks the charts side of visualisation). I’d really appreciate any additions or comments you can make – particularly around tips and tools.

UPDATE: It has now been published in The Online Journalism Handbook.

Visualisation tools

So if you want to visualise some data or text, how do you do it? Thankfully there are now dozens of free and cheap pieces of software that you can use to quickly turn your tables into charts, graphs and clouds.

The best-known tool for creating word clouds is Wordle (wordle.net). Simply paste a block of text into the site, or the address of an RSS feed, and the site will generate a word cloud whose fonts and colours you can change to your preferences. Similar tools include Tagxedo (tagxedo.com) and Wordlings (http://wordlin.gs), both of which allow you to put your word cloud into a particular shape.

ManyEyes (manyeyes.alphaworks.ibm.com/manyeyes/) also allows you to create word clouds and tag clouds – as well as word trees and phrase nets that allow you to see common phrases. But it is perhaps most useful in allowing you to easily create scattergrams, bar charts, bubble charts and other forms. The site also contains a raft of existing data that you can play with to get a feel for the site. Similar tools that allow access to other data include Factual (factual.com), Swivel (swivel.com)[see comments], Socrata (socrata.com) and Verifiable.com (verifiable.com). And Google Fusion Tables (tables.googlelabs.com) is particularly useful if you want to collaborate on tables of data, as well as offering visualisation options.

More general visualisation tools include widgenie (widgenie.com), iCharts (icharts.net), ChartTool (onlinecharttool.com) and ChartGo (www.chartgo.com). FusionCharts is a piece of visualisation software with a Google Gadget service that publishers may find useful. You can find instructions on how to use it at www.fusioncharts.com/GG/Docs

If you want more control over your visualisation – or want it to update dynamically when the source information is updated, Google Chart Tools (code.google.com/apis/charttools) is worth exploring. This requires some technical knowledge, but there is a lot of guidance and help on the site to get you started quickly.

Tableau Public is a piece of free software you can download (tableausoftware.com/public) with some powerful visualisation options. You will also find visualisation options on spreadsheet applications such as Excel or the free Google Docs spreadsheet service. These are worth exploring as a way to quickly generate charts from your data on the fly.

Publishing your visualisation

There will come a point when you’ve visualised your data and need to publish it somehow. The simplest way to do this is to take an image (screengrab) of the chart or graph. This can be done with a web-based screencapture tool like Kwout (kwout.com), a free desktop application like Skitch (skitch.com) or Jing (jingproject.com), or by simply using the ‘Print Screen’ button on a PC keyboard (cmd+shift+3 on a Mac) and pasting the screengrab into a graphics package such as Photoshop.

The advantage of using a screengrab is that the image can be easily distributed on social networks, image sharing websites (such as Flickr), and blogs – driving traffic to the page on your site where it is explained.

If you are more technically minded, you can instead choose to embed your chart or graph. Many visualisation tools will give you a piece of code which you can copy and paste into the HTML of an article or blog post in the place you wish to display it (this will not work on most third party blog hosting services, such as WordPress.com). One particular advantage of this approach is that the visualisation can update itself if the source data is updated.

Alternatively, an understanding of Javascript can allow you to build ‘progressively enhanced’ charts which allow users to access the original data or see what happens when it is changed.

Showing your raw data

It is generally a good idea to give users access to your raw data alongside its visualisation. This not only allows them to check it against your visualisation but add insights you may not otherwise gain. It is relatively straightforward to publish a spreadsheet online using Google Docs (see the sidebar on publishing a spreadsheet)

SIDEBAR: How to: publish a spreadsheet online

Google Docs (docs.google.com) is a free website which allows you to create and share documents. You can share them via email, by publishing them as a webpage, or by embedding your document in another webpage, such as a blog post. This is how you share a spreadsheet:

  1. Open your spreadsheet in Google Docs. You can upload a spreadsheet into Google Docs if you’ve created it elsewhere – there is a size limit, however, so if you are told the file is too big try removing unnecessary sheets or columns.
  2. Look for the ‘Share’ button (currently in the top right corner) and click on it.
  3. A drop-down menu should appear. Click on ‘Publish as a web page’
  4. A new window should appear asking which sheets you want to publish. Select the sheet you want to publish and click ‘Start publishing’ (you should also make sure ‘Automatically republish when changes are made’ is ticked if you want the public version of the spreadsheet to update with any data you add.)
  5. Now the bottom half of that window – ‘Get a link to the published data’ – should become active. In the bottom box should be a web address where you can now see the public version of your spreadsheet. If you want to share that, copy the address and test that it works in a web browser. You can now link to it from any webpage.
  6. Alternatively, you can embed your spreadsheet – or part of it – in another webpage. To do this click on the first drop-down menu in this area – it will currently say ‘Web page’ – and change it to ‘HTML to embed in a page’. Now the bottom box on this window should show some HTML that begins with
  7. If you want to embed just part of a spreadsheet, in the box that currently says ‘All cells’ type the range of cells you wish to show. For example, typing A1:G10 will select all the cells in your spreadsheet from A1 (the first row of column A) to G10 (the 10th row of column G). Once again, the HTML below will change so that it only displays that section of your spreadsheet.

Once again, I’d welcome any comments on things I may have missed or tips you can add. Part 5, on mashups, is now available here.

Data journalism pt3: visualising data – charts and graphs (comments wanted)

This is a draft from a book chapter on data journalism (the first, on gathering data, is here; the section on interrogating data is here). I’d really appreciate any additions or comments you can make – particularly around considerations in visualisation. A further section on visualisation tools, can be found here.

UPDATE: It has now been published in The Online Journalism Handbook.

“At their best, graphics are instruments for reasoning about quantitative information. Often the most effective way to describe, explore, and summarize a set of numbers – even a very large set – is to look at pictures of those numbers.” (Edward Tufte, The Visual Display of Quantitative Information, 2001)

Visualisation is the process of giving a graphic form to information which is often otherwise dry or impenetrable. Classic examples of visualisation include turning a table into a bar chart, or a series of percentage values into a pie chart – but the increasing power of both computer analysis and graphic design software have seen the craft of visualisation develop with increasing sophistication. In larger organisations the data journalist may work with a graphic artist to produce an infographic that visualises their story – but in smaller teams, in the initial stages of a story, or when speed is of the essence they are likely to need to use visualisation tools to give form to their data.

Broadly speaking there are two typical reasons for visualising data: to find a story; or to tell one. Quite often, it is both. Continue reading